How about a birthday card for a boy? Do you have as much trouble making male cards as I do? For some reason it's just hard for me to come up with ideas for men and boys. I'm ok with making cards for my hubby and son but anyone else is a little tougher. Well, I found this awesome card and wanted to make one for my son's friend Jason. Jason turned 12 and loves to play the guitar. This card was perfect for him. Let me know what you think.
12/19/11
12/17/11
Packing Paper Gift Wrap
Wondering what to do with all that packing paper that comes in your Stampin' Up! Orders?? How about using it to wrap Christmas gifts?? I wanted this to look a little rustic so I really crumpled the paper first. So fun.
Check back later to see the snowman ornament instructions.
MERRY CHRISTMAS!
Another Magnetic Board & Glitter Magnets!!
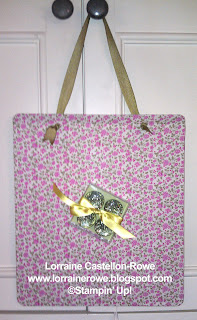
Here's another magnetic board I made today.
For instructions on how to make this board and the magnets see this post: http://lorrainerowe.blogspot.com/2011/12/magnetic-boards-for-christmas.html
MERRY CHRISTMAS!
12/14/11
Magnetic Boards for Christmas
It's Christmastime and I'm busy making some gifts for friends and family!!
These magnet boards were gifts for some of my amazing stamping friends.
They were so easy to make too. I bought some cookie sheets, sprayed them with adhesive, laid our BEAUTIFUL FABRIC over them, folded the edges back nice and neat then covered the back with felt sheets using spray adhesive also. I used the Crop A Dile to punch holes through the tops, tied ribbon through the holes and presto, chango, pretty magnetic boards to hang in your favorite room!!
I also made the magnets!! I bought some flat backed clear marbles at a craft store, washed and dried them, poured Crystal Effects on the flat side, poured our amazingly sparkly glitter on the Crystal Effects, let that dry then hot glued some magnets to the backs. So easy and quick.
I hope you like my projects today. AND, if you do, let me know. I'd love to read your comments and see what you think.
MERRY CHRISTMAS!!
12/12/11
Modern Ornament
How about a pretty ornament to add to your holiday decorations? I found this tutorial and thought I'd give it a try. I didn't want to use plain white cardstock so I punched my strips with the Eyelet Border Punch. My strips were 10" long. The tutorial uses 11" strips. I also added some beads to the bottom of mine for sparkle. There are so many things you can add to this, glitter, rhinestones, pearls, punched shapes, whatever you can think of!! This would look beautiful with some of our Designer Series Cardstock too. I just wanted to try white for my first one. It only took about 10 minutes to make and that was because I punched the strips. I could see a bunch of these hanging in our window. That is, if I get time to make them. HA!
Here's a little tip if you want to add beads to your ornament. I cut a piece of 24 gauge wire to use as my "needle". Just fold the wire in half and thread your string through then thread the bead with the wire and pull!! So simple. There was no way I was going to get the string through the bead without the wire. You could also just use the wire to string your beads onto.
I hope you're enjoying your holiday seasoon as much as I am. Thanks for taking time to stop by and see me
Lorraine :0)
Subscribe to:
Comments (Atom)


