2/8/08

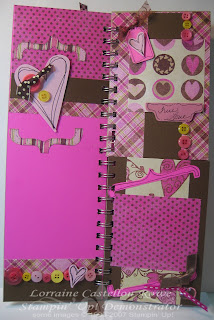
So Full of Love

Ok, as promissed, here's the board book I made at a class at Scrapbook U ::: "The Best Little Store Around" :: Fremont CA, my local scrapbook store. Our instructor was Amber. If you haven't had a chance to take one of Amber's classes, WHAT ARE YOU WAITING FOR??!!?? She's one of the best teachers around and I promise you'll love her work! Ok, enough talking, here's what you're here for...the pictures!! Hope you have a wonderful weekend and thanks so much for taking the time to stop by. It really means a lot to me that you're here!


2/1/08

SALE A BRATION STARTS NOW!!

February 1-March 17, 2008

Our Sale-A-Bration promotion gives everyone a reason to celebrate!

Promotion Details:

Customers: For every $50 purchase you make, you can choose a FREE Sale-A-Bration product. There is no limit!

Hostesses: In addition to our regular hostess benefits, you can choose a FREE Sale-A-Bration stamp set for workshops that reach $300 or more.

Recruits: Anyone who joins as a demonstrator during Sale-A-Bration can choose ANY STAMP SET--a value of up to $47.95--from the current catalog.
Plus, new demonstrator recruits get 20% off the Demonstrator Starter Kit--over $350 of Stampin' Up! products and business supplies for only $159! All Sale-A-Bration products are exclusive to this promotion and will never be offered again.

You can click this link: Stampin' Up! - Sale-A-Bration! to download your very own Sale A Bration Brochure. Or, you can send me an email and I'll mail you one. If the above link doesn't work you can copy and paste this address into your web search bar: http://www.stampinup.com/us/enu/9754.asp

Don't miss your chance to earn free products! Call or Email me today to book your workshop. We can have your workshop at your home or mine. I'll do all the work, you just invite your family and friends to come and stamp and have a nice relaxing time!!

Oh, and don't forget Stamp Camp!!
Come, enjoy a fun day of stamping, win prizes, eat lunch and spend time with your friends! Stamp camp is March 9th and the cost is $40.

I look forward to seeing you at an event soon!!

Lorraine Castellon-Rowe
Your Stampin' Up! Demonstrator
510/573-7693 - Home Office
408/757-6373 Cell


1/31/08

Another Criss Cross Card

Well, since you have those extra triangles left over after making that first criss cross card I thought I'd go ahead and use them. Here's another criss cross card. Have a great evening. I'm off to a scrapbook class at Scrapbook U, my LSS (Local Scrapbook Store)!! I'll post pics of what we make tomorrow.

Summer Picnic DSP Cris Cross Card & SALE A BRATION!!

Here's my first attempt at a criss cross card all on my own. I've done one before but it was a fellow stampers design and I just made it as a make & take. This one I created from scratch using Lynn's no waste criss cross tutorial on Splitcoast Stampers. You can read the full thread to this post/tutorial here: Criss Cross No Waste Card Lynn I used the new Summer Picnic Designer Series Paper that will be available in our Occasions Mini Catalog beginning March 1. Plus I used some of the Rub Ons that are available in our Sale A Bration Mini beginning TOMORROW, FEB 1!! Beginning Feb 1 you can check out all of the other things you can earn for FREE in our Sale A Bration Catalog online at Stampin' Up! - Customer Homepage then click the catalog link. Remember, for EVERY $50 you purchase from the Spring Summer Catalog you will be able to choose a FREE item from the Sale A Bration Catalog!! Call or email me NOW to book a workshop or class! Home Office: 510/573-7693, Cell 408/757-6373 or email: Ltrain26@aol.com.

Technique Meeting Make & Take Cards

Following are the cards we made at our monthly meeting. Each card features a different technique. Basic instructions are under each card. I hope you like them. I had so much fun at our meeting. I just LOVE our meetings. It's just an excuse to hang out with my friends and STAMP! What a great group of ladies I get to call my friends! I hope you get a chance to stamp and hang out with your friends soon! Have a great day! Lorraine

STIPPLING
Direct to Stamp,Ink a solid stamp with a light color ink. Dab the stipple brush on a darker inkpad, or onto a puddle of reinker. Dab off any excess. Stipple directly onto the inked stamp in a random pattern, circle or stripe. Stamp the image onto the paper.

THUMPING
Ink stamp with classic ink. Using a coordinating color of brush marker, thump the color onto the stamp as if you were holding a drumstick. Then stamp the image onto cardstock for a multicolored effect.
FAUX POSTAGE
Print faux postage template on cardstock. Make an acetate mask with an opening for each postage stamp. Sponge, then stamp each opening. Sponge additional color if desired. Cut around faux postage piece with decorative postage scissors.
RUBBER CEMENT
Dribble rubber cement onto glossy paper in a striped pattern. Let dry. Bray with classic ink. Remove rubber cement by rubbing. Repeat if additional colors are desired.

SHAVING CREAM Spray shaving cream into a pan. Add several drops each of 2-3 classic ink refills. Swirl colors with a plastic knife or skewer. Place cardstock on top of the shaving cream. Press down gently. Remove card, scrape off excess shaving cream and dry for a fun background of color.
ROCK & ROLL
Choose two coordinating colors of classic ink. Ink the stamp in the lighter color. Roll the edges of the stamp in the darker color of ink. Then stamp the image onto cardstock for a two-toned effect.
WATERCOLOR CRAYONS
Watercolor and shimmery white cardstock are best for watercoloring. Add color to stamp using the crayons. Wet the stamp using the aqua painter or a fine spritzer. Stamp onto paper. Wet the paper first if desired. For a background or to color an image, pick up color directly from the crayon with a wet brush or aqua painter.

FOSSIL STONE
Using a page protector, cut off the top and one side so that it opens like a book. Press one classic pad all over the inside of one side of the page protector. Press a different color on the opposite inside of the page protector. Close the pages together to mix the ink. Open, place your glossy cardstock inside and close again. Run your brayer over and open. You can do 2 pieces of glossy cardstock at the same time by placing them back to back before you put them inside the page protector.
EMBOSSED PASTELS
Stamp images in Versamark Ink on dark cardstock. Emboss with white embossing powder. Take a blender pen and dip into Stampin’ Pastels. Color over the embossed images and let dry.
This is a pretty cool technique we learned at Leadership this year. Use staples and add your beads. I love this technique!!
MISTING Gently spray cardstock using a spritz bottle of water. Immediately stamp using classic ink pads. Another option is to ink up the stamp and spray the rubber before stamping. Or, spray the paper immediately after stamping. (Circle background is misted on watercolor paper. Not my favorite technique. I think this turned out ok but I think I would like just a plain stamped background for the future.)

1/28/08

I've Been TAGGED!!

I was tagged by Courtney Fowler…I've never done this before so here goes! Thanks for thinking of me Courtney! Hey, go check out Courtney's blog, she's got some great stories on there as well as some awesome stamped eye candy!

Five things I was doing 10 years ago
This one's hard for me. I can barely remember what I was doing yesterday let alone 10 years ago!!
1. Enjoying not working a full time job.
2. Lot's and lot's of SU! workshops
3. Traveling a lot
4. Decorating our home
5. Trying to get pregnant

Five things on my to do list today
1. Laundry... YUK! (yeah me too Courtney!)
2. Cut all the cardstock for my meeting tonight
3. Take care of my little man - he's sick
4. Color my hair
5. Oh, and take a shower...LOL!!

Five things I will do when I’m a millionaire
1. Pay off each family members house (that's because when I become a millionaire I will have millions and millions! LOL)
2. Buy a larger home for us
3. Invest for the future
4. Give some to charity
5. Do some traveling

Five things I’ll never wear again
1. Leg Warmers
2. Spaghetti strap tops
3. A bikini :0(
4. Scrunchies (elastic bands are what I wear now when I have my hair up. Used to love those scrunchies though. Had them in every color to mach whatever I was wearing. LOL)
5. A size 6

Five of my favorite toys
1. Anything in my Stamp Room
2. My Computer
3. My Son...ok he's not a toy but we have so much fun together playing with his toys!
4. How about going to Scrapbook U for classes. Does that count?
5. hmmm...can't think of anything else. How sad that I don't have even "5" toys. I'll have to work on that one.

Five banes of my existence
1. LAUNDRY, yes I totally agree Courtney!!
2. Cleaning the toilet
3. When my baby is sick. I wish I could take it all and have him healthy all the time!
4. Mean, cranky, negative people!!!
5. OBGYN appointments...yuck!

I’m going to tag:
Crafting with SueR
Cristina Wright
Kathie McGuire
Emy Yow Elizabeth's Stamping Blog
Beate Johns Fresh & Fun

1/27/08

Happy Everything

Here's a card I made for 2 special people in my life. I can't give you all the details right now but as soon as I know they both received the cards I'll explain more. Hope you like it!

Cards from my friend Jennifer Ma

I had a friend come over yesterday to check out our Stampin' Up! Punches and she gave me a couple of the cards she made for a swap! How lucky am I??!!?? Check out the cards and you'll see how lucky I am!! These cards are so cute, I love them. Jennifer is a Close to My Heart consultant so these cards are made with their supplies. The "With Love" card is a copy of the card on page 108 of the SU! Spring Summer Catty. Very nice cards Jennifer and thank you for sharing them with me!! I hope you all have a wonderful week!


Oh, one more thing, I know I haven't been around much lately but stay tuned, Tuesday I should be posting a few of the cards we make at tomorrow's meeting. Thank you so much for hanging in there with me!

1/18/08

One more reason to LOVE Stampin' Up!!!!!!!!

Check this out. This company has got to be the best company ever to work for!! I'm so proud to say I'm a Stampin' Up! Demonstrator!!
Click here: SU! Surprises some very hard workers!

1/17/08

Card Folder from my Up Upline!!

Yes, I got to see my Up Upline at Leadership and it was so nice!! Here's the totally awesome card folder she gave me. I just love her work. She always give us (her downline) something totally different at each event. Isn't she the best!! Yes, she is!! Thanks so much Debra!

Flowers from Courtney!!


WOO HOO!! YIPPEE!! HOORAY!! SKIP A DEE DOO DA!!

I received e-flowers from my special blogging friend Courtney Flower (oops I mean Fowler!! tee hee) Thank you so much Courtney. You totally made my day!

Now, I think I am supposed to give these to 10 blogging friends. I really don't have that many blogging friends so I've added the few I do have. I visit a lot of awesome blogs but I don't personally know that many thus the short list.
Here goes....
Nicole Cooke Nicole Cooke The Stampin' Librarian
Emily Weems Emily Weems Stamping Expressions
Emy Yow Emy Yow Elizabeth's Stamping Blog
Sue Reynolds Crafting with SueR
Kathie McGuire Kathie McGuire
Lorie Ames Live-Love-Laugh-Create
Christina Wright Cristina Wright

Snow Card from Valerie Cooke

Here's a totally cute card I received from one of my downline gals. It included a change of address card inside and a Happy New Year's note. Check out the snowman's hat...it's totally sparkling with glittah!! Now that's a snowman after my own heart. Thanks Valerie! I love this card!

I'm a Blog Candy WINNER!!

I know, I can't believe it either!! I actually won a Blog Candy giveaway!!! Look at this beautiful scarf and stamp set I won!! I entered a contest on Nicole Cooks's blog and won this awesome stuff!! Not to mention the absolutely adorable card!!! Nicole hand stamped this beautiful silk scarf and added some sparkly bling to it. It's tied to my purse right now!! She also sent me a blank scarf to stamp myself. I'll post pics of that when it's done. PLUS Maria over at Kitchen Sink Stamps sent me this totally awesome stamp set!! Am I a lucky girl or what??!!?? YOU KNOW I AM!! Thank you so much to Nicole and Maria for the excellent gifts! Now, go and check out Nicole's blog Nicole Cooke The Stampin' Librarian and Kitchen Sink Stamps for some really remarkable artwork and stamps!!!

Leadership Make & Takes

Here are the projects we made at Leadership. I absolutely LOVE the scrapbook page. It's mounted on a large piece of chipboard from the On Board Book Basics set. What a cool idea!!! I'm going to hang this in my craft room after I add a picture. Thanks again for stopping in to see me! I love having visitors.


Leadership Swaps


Ok, now this is the very first time I've ever made swaps for a Stampin' Up! event. My plan was to make 100 but life happened and I only ended up making 12. WOO HOO!! I know that's not many but for me it was so cool that I made any at all. The first card here is the one I made. I paper pieced the little bird and used the small star punch for the flower. The sets used are Fun & Fast Notes and Cause for Celebration Hostess set, Level 2. The rest of these beautiful cards are the ones I received at Leadership. I'm so glad I went. It was absolutely beautiful in Palm Springs and I had such a great time with my friends!! I'm happy to be home now though. It's always nice to sleep in your own bed. :0) Hope you are all having a wonderful day and I sincerely thank you for stopping in to see me.

Secret Sis Cards


Well, Happy Thursday to you all!! I just want to share some cards I received from my absolutely wonderful Secret Sis. I joined the Secret Sister club on Lorie Ames' blog early this month and boy am I glad I did!! So far I have received these 2 absolutely beautiful cards from my Secret Sis. Isn't she so sweet!!??!! I already love her and I have no clue who she even is! :0) Thank you to my totally sweet Secret Sis. I can't wait to find out who you are!! You are making my days so much brighter and getting mail so much fun!

1/9/08

Off to Leadership!

Well, I'm off to the Stampin' Up! Leadership Conference today and I am so excited! Beautiful Palm Springs here we come! WOO HOO!! I'll be bringing my laptop but don't know if I'll get a chance to use it. If I do, I'll write from there. Although, last night we were having some technical difficulties. For some reason this darn computer didn't want to start. It kept shutting down on me. It would try to start up and then BAM, it would shut down. I'm online for the moment but who knows when it's gonna' act up again. So, I hope you all have a wonderful week and I'll see you all when I can. Happiness and hugs to you all! Lorraine

Create your own Rub Ons!

I just tried this technique and it worked perfectly! I used Overhead Transparency Sheets and followed the directions and voila, a perfect rub on and in Groovy Guava!! Or as close to Groovy Guava as I could get. Sorry I don't have a picture because I was just playing around on typing paper but it really works! You've got to try this! I found this tip on a blog I subscribe to called Debby's Stampin'Heaven. You can check out more of Debby's great tips and see some fantastic work by going to www.debbysstampinheaven.blogspot.com. I tried to post the link here but for some reason it's not working but you can just copy the address and paste it into your browser to get there. Thank you so much Debby for allowing me to post this on my blog! Debby couldn't remember who actually came up with this tip so if you are reading this and you are that very creative person, please let me know. I would like to give you full credit for creating such an awesome technique! Happy rubbing!!! LOL!!

Ok, here are the directions:
This technique is just too cool! Rub-ons are all the rage these days, but you may find it difficult to locate the perfect theme, color, etc. for your project. Well, now you can custom make your own!
Supplies you will need:
Transparency sheet or a piece of page protector, cut to fit your printer. (Most will be 8.5 x 11)
Popsicle stick (or similar object to rub the ink)
Computer and Word Processing Program Printer
1) Open your Word Processing Program, and type the words you want to use for your rub-ons. Choose your favorite font, color, size etc. You can even add a graphic if you like!
2) Choose "Print". Click on "properties" and choose the following: "Best Quality" (you want as much ink as possible on the transparency) "Mirror" or "Word Flip" (this will flip your text so that it's backwards.
3) Now print. If you're using a transparency, be sure and print on the slick side, not the rough side. If you're using page protector, either side is fine.
4) After it prints, set it aside to dry for 15 minutes. (Of course I couldn't wait 15 minutes so I just blew on it the first time and it worked fine. The second time I tried it I didn't even blow on it and it worked too!! Just be really careful cuz' it will smear. Lorraine) Don't touch it, it will smudge!
5) Choose the paper/project you want to use. Place the transparency, ink side down on the paper. Using the Popsicle stick, rub firmly across all the letters. Lift it up and voila! Your text is on your project!

Isn't that soooooo cool?!?!? If you try this please leave me a comment and let me know how it worked for you. And, of course, if you make a project using this technique I'd love to see that too! Thanks for checking in and I hope you have a great day! Lorraine

1/7/08

NEW GUEST BOOK ADDED!

Hi to all of my wonderful blog readers!! I just added a guest book at the very end of the first page. I would love it if you would sign it. I am so curious to see who you are and where you are all from! Thank you so much for your continued support and interest in my blog. You ALL mean so much to me. Without you I wouldn't have this blog and I appreciate each and every one of you! Sincerely, Lorraine

1/5/08

4" x 4" Card with Circles

Here's a card I cased from a card I saw in Cards Magazine. The original card was created by Kristina Werner. Here's my version. Happy Saturday!

1/4/08

T-shirt Transfer Images

Have you ever tried this??!!?? It couldn't be simpler! All you need to do is stamp directly on T-Shirt Transfer paper, cut out and iron onto your t-shirt! I think the images turned out great! For the center, larger flower I used a SU! Craft pad in Baroque Burgundy and for the smaller flowers and the leaves I used Classic Pads in Wild Wasabi and Groovy Guava. You can tell the difference in the images. The Craft images are much more solid whereas the Classic pad images are a little modeled looking. I like both images and will use both types of pads in the future depending on how I want them to look. Here's a picture of the images close up. I didn't take a picture of the whole t-shirt because it's an old t-shirt I just used to practice on. I hope you give it a try. When I make a full t-shirt I'll definitely share with you. Happy creating! Lorraine

Related Posts with Thumbnails